web analytics
Skip to main content
Tag

PowerPoint 2016

PowerPoint vs. PowerPoint Online

By blog

What is the difference between PowerPoint 2016 and PowerPoint Online? In about 10 minutes, learn how Microsoft’s two presentation applications stack up. Contents:

00:40 – PowerPoint 2016 Mac vs. Windows overview & the ribbon interface
01:40 – PowerPoint Online overview & ribbon UI
02:30 – How the ribbon interfaces compare (Home, Review, Transitions)
03:45 – Comparing Animations in PowerPoint 2016 and PowerPoint Online
05:00 – Designs and themes in PowerPoint Online vs. PowerPoint 2016
05:35 – Saving files in PowerPoint Online and OneDrive
07:00 – Issues with OneDrive and collaboration
07:45 – Conclusion on features … but what about costs? The video is narrated by the founder of In 30 Minutes guides, which includes PowerPoint Basics In 30 Minutes.

How to set up the PowerPoint Quick Access Toolbar

By blog

In less than three minutes, learn how to set up the PowerPoint Quick Access toolbar in PowerPoint 2016 for Windows and macOS (part of the Microsoft Office 365 suite). The PowerPoint 2016 Quick Access Toolbar can be a huge time saver for PowerPoint users, including teachers, lecturers, entrepreneurs, startup founders, community leaders, government officials, managers, and others. This short PowerPoint video is narrated by the founder of In 30 Minutes guides, which includes PowerPoint Basics In 30 Minutes.

How to insert PowerPoint video files

By blog

If you want to further enhance your PowerPoint presentation, you have the option to insert video within slides. Smart use of these elements can help you engage your audience and add another dimension to your slide deck. Your video will begin playing immediately when you reach that slide during your presentation.

How to insert a video

Let’s say you want to add a hilarious clip of a cat doing taxes to your PowerPoint slide. To do so, you will use the Video tool on the Insert tab.

PowerPoint Insert video tabYou can insert an online video or a video you have stored on your PC. Select the appropriate option and a pop-up window will open. Navigate to the video file storage location (if on your PC) or choose OneDrive or YouTube (if getting a video from the Web). Alternatively, you can paste video embed code if you have copied it from another location.

Once you have located the video you want, click OK on the pop-up window. PowerPoint will add the video to your slide. You will resize, move, and delete the video the same way you would a stationary image. Visit that section in the previous chapter for a refresher if necessary.

PowerPoint Online limits video selections to online sources such as YouTube. The PowerPoint mobile apps for Android and iOS require access to videos stored on the device.

Editing and formatting a video

Using the tools on the Video Tools Format tab, you can make a multitude of adjustments ranging from correcting the brightness and contrast, to choosing a new Video Style, to altering the video’s shape and border.

The tools on the Video Tools Playback tab can be used to trim your video, add a fade in or fade out effect, adjust volume, and insert captions. While I’m not going to go into detail on video formatting or editing in this book, you can find great Microsoft tutorials using the Tell Me tool.

How to convert Google Slides to PowerPoint .pptx files

By blog

In the following short video, learn how to convert a Google Slides presentation to a PowerPoint .pptx file, which can be opened in Microsoft PowerPoint 2016, PowerPoint 2013, or PowerPoint 2010. The video is just three minutes long. This is useful for sharing presentations with people who don’t have or can’t use Google Slides, or to leverage PowerPoint’s superior formatting and themes.

How to insert simple shapes in PowerPoint

By blog

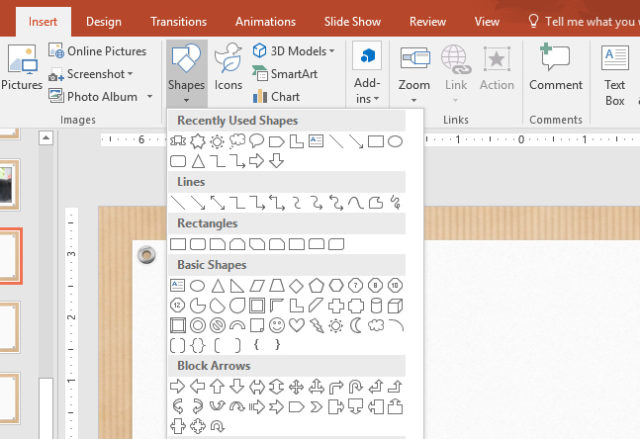
You’ll find shape tools in several locations within PowerPoint’s tabs. On the Home tab, you can insert a PowerPoint shape by selecting one from the Shape Gallery in both the desktop version of PowerPoint (Windows/macOS) as well as in PowerPoint Online. You can also access an expanded Shape Gallery using the Shapes tool on the Insert tab. In PowerPoint for Android and iOS, the Shapes tool can be accessed via the Insert tab.

Simply select the shape you want and then click the slide in the location you wish it to appear. From there you can:

  • Resize the shape by clicking and dragging its sizing handles.
  • Move the shape by clicking within it and dragging it to a new location.
  • Rotate the shape by clicking the rotation handle above the shape and then dragging it left or right.
  • Delete the shape by clicking within it and then pressing the Backspace key on your keyboard.

PowerPoint Shapes GallerySimple shape edits

PowerPoint also provides tools to edit any shape you’ve already inserted. You can quickly change the Shape Fill, Shape Outline, and add Shape Effects using the tools on the Home tab. For even more options, navigate to the Drawing Tools Format tab where you can:

  • Edit Shape. Use this tool to change the shape to an entirely different selection in the Shape Gallery or adjust individual points to create a freeform result.
  • Shape Styles. Quickly change your shape fill, border, and effects to a variety of preset combinations within your PowerPoint theme. Hover over each one to see a preview of the results.
  • Shape Fill. Choose a new fill color, add a gradient or texture, or fill the shape with a picture.
  • Shape Effects. Add shadow or glow, bevel the shape’s edges, and more.

This is an excerpt from PowerPoint Basics In 30 Minutes. The book is a available for purchase on Amazon, B&N, Apple, and other online stores.

PowerPoint display options

By blog

PowerPoint 2016’s View tab includes five Presentation View options and three Master View options. Some of these PowerPoint display options are likely to be more useful to you—especially as a novice PowerPoint user—than others will be. I suggest initially familiarizing yourself with the following options:

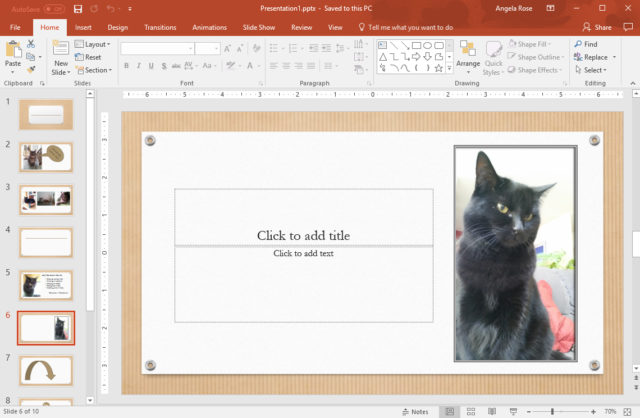
  • Normal. As PowerPoint’s default view for good reason, Normal is the one you’ll use most often. It is divided into three sections: the Slide Area, or right three-quarters of the screen; the Slides pane, or left one-quarter of the screen; and finally, the Notes pane, at the bottom of the screen.You will create and edit slides in the Slide Area, scroll through and choose slides in your presentation in the Slides pane, and add any necessary notes in the Notes pane. You can hide or reveal the Notes pane by clicking the Notes icon in the Status Bar at the bottom of your screen.
  • Reading View. If you’d like to view your slides in full-screen mode, this option will allow you to do so. You can quickly move through the slides in your presentation using the left and right arrow keys on your keyboard or arrow icons in the Status Bar. Return to the Normal view by clicking the final slide to exit, clicking Esc, or by clicking the Normal icon in the Status Bar.
  • Slide Master. Master slides—if you choose to use them—can control the appearance of your entire presentation, from colors and fonts to shapes, images, and just about everything else. When you edit master slides in Slide Master view, the modifications you make influence the rest of the slides within your presentation. We’ll talk more about master slides in Chapter 2.
  • Slide Sorter. Quickly drag slides to reorder your presentation. You can copy, duplicate and delete slides in this view as well. 
PowerPoint Normal View

PowerPoint Normal View

There are two additional essential view options accessible from other tabs on the Ribbon. These are:

  • Slide Show. Click From Beginning or From Current Slide on the Slideshow tab, and PowerPoint will play your presentation in full-screen mode according to your preference. You can use Slide Show view to preview your presentation or to actually present it to an audience. Exit Slide Show view by pressing the Esc key on your keyboard.
  • Presenter. If you’re presenting your PowerPoint slide deck to an audience in a situation in which you have two displays to work with—such as your laptop and a projector—select Use Presenter View. It will display the actual slides on the projector (in Slide Show view), while displaying your presentation in Presenter View on your laptop. This enables you to use a variety of tools to enhance the presentation as it is playing. We will discuss these tools a bit more in Chapter 4.

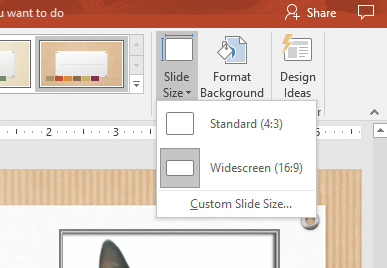
The default slide size is Widescreen, which has a 16:9 aspect ratio. This is ideal for presenting your PowerPoint deck on widescreen monitors and projectors. However, if you intend to play your presentation on a smaller screen, you can change the slide size to Standard, which has a 4:3 aspect ratio, by selecting the Slide Size tool on the Design tab. Other sizes are available, but these are the two you are most likely to use. When in doubt, stick with widescreen, as it’s easier to reduce the size of slides after the fact than to enlarge them.

PowerPoint slide size

This is an excerpt from PowerPoint Basics In 30 Minutes. The book is a available for purchase on Amazon, B&N, Apple, and other online stores.

What is PowerPoint’s “Backstage View”?

By blog

PowerPoint’s Backstage View screen is a one-stop shop for many common tasks, including starting new presentations and saving files. Backstage View also includes additional features such as exporting files, printing, and changing certain software settings.

You can get to Backstage View at any time by selecting File (Windows or PowerPoint Online) or the File icon (macOS) located at the top left of your screen. Navigating Backstage View is easy, thanks to the simple menu displayed on the left side of the screen:

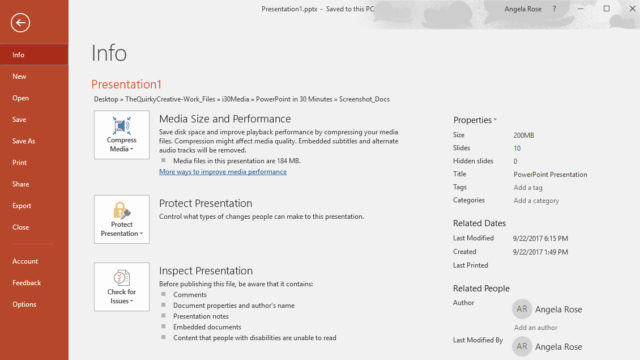
PowerPoint Backstage ViewWe will go into more detail on many of these menu items in PowerPoint Basics In 30 Minutes. For the time being, here’s a quick overview of the tools in Backstage View for the Windows version of PowerPoint 2016:

  • Info. Review your presentation’s properties such as file size and slide count. You can also access tools for protecting, inspecting and managing the presentation. We will dig deeper into the protection options in Chapter 4.
  • New. Start a new presentation from scratch or select a template for customization.
  • Open. Open an existing presentation stored on your computer, network, or the cloud.
  • Save and Save As. Select one of these to save your presentation under its current file name or save a copy in a new location, under a new file name, or as a different file type. We’ll talk more about saving files later in this chapter.
  • Print. This is where you will go if you ever want to print your PowerPoint presentation. We’ll dig deeper into printing in Chapter 4.
  • Share. PowerPoint 2016 has features that enable you to share your presentation with others through the cloud or by email. This is also where you’ll find the options for presenting your PowerPoint Online and publishing slides. We’ll talk more about much of this in Chapter 4.
  • Export. You can save your presentation as a .pdf document, package your presentation for CD, or create handouts. We’ll talk more about exporting in Chapter 4.
  • Close. If you don’t want to close your PowerPoint presentation using the “X” in the top-right corner of your screen, you can click Close in Backstage View. There are also keyboard shortcuts (see the list in the Appendix).
  • Account. If you have purchased an Office 365 subscription, you can access your account settings and recent updates here.
  • Feedback. The programmers at Microsoft are continually updating the features and functionality of the programs within the Microsoft Office suite, including PowerPoint. If you would like to give them feedback, it’s easy to do so here.
  • Options. PowerPoint 2016 includes plenty of settings you can customize to your liking. We’ll touch on some of them later in the book.

To exit Backstage View and return to your presentation, simply click on the back arrow at the top of the menu (Windows or PowerPoint Online) or press the Cancel button (macOS).

Backstage View for the Mac version of PowerPoint 2016 covers new presentation creation and opening existing files, as well as access to basic account information. However, Save As, Print, Share, Export, and Close are not visible from the Mac version of Backstage View and have to be accessed via the File drop-down menu at the top of the screen. As for Options, many settings in the Mac version of PowerPoint 2016 can be accessed via PowerPoint > Preferences.

This is an excerpt from PowerPoint Basics In 30 Minutes. The book is a available for purchase on Amazon, B&N, Apple, and other online stores.